Welcome to Part 3 of Orbit the Dragon's crochet-along!

Your dragons are starting to take shape, and looking spectacular I might add! I'm really enjoying all the interesting colour combinations, the size variations, and your own personal twists on the design - we even have some with beautiful open eyes! Keep those pictures coming - you can share photos by joining the Projectarian Facebook group or use the #OrbitTheDragon hashtag on Instagram. You can tag me using @Projectarian on both platforms.
In other news, I'm starting a new regular contest on my Instagram, where you can win one of my fanciful beasts every single week! Check out the #ProjectarianWednesdayWinner hashtag to enter!


THE LEGS

Make 2 Front Legs and 2 Back Legs.
PUFF STITCH (AND CHANGING COLOUR)
(YO, insert hook, draw up a loop) 4 times. YO with new colour, draw through all 9 loops on hook. Ch1. Puff Stitch and colour change complete.
BACK LEGS
Finished size: 100mm long x 30mm at the widest point.
R1: Using Paw Colour, 6SC into a magic ring. (6)
Continue working in the round.
R2: 2SC in each st around. (12)
R3: *SC in next st. 2SC in next st.* Repeat all around. (18)
Change to Body Colour at the end of row 3. Do not cut the Paw Colour.
R4: Using Body Colour, SC in 1st st. *Change to Paw Colour, then Puff Stitch in next st. Change to Body Colour then SC in next st.* - three times. Cut Paw Colour, leaving a short tail (10cm). SC in rem 11 sts around, working over the Paw Colour tail for a few stitches to secure it. (15SC and 3 Puff Stitches)


R5: SC in each st around. When working into the Puff Stitch, skip the ch1 part of it, and work into the Paw Colour part of it. This will cause the SC to hide some of the excess Paw Colour. (18)

R6-23: Continue working in the round. SC in each st around. (18)
Before working rows 24 & 25, it’s time to stuff the leg. The bottom of the leg is the foot. The top of the leg is the hip (or shoulder on front legs).
IMPORTANT: Stuff the first half of the leg firmly, and the second half of the leg softly. Keep in mind that when you assemble your dragon, you’ll want the limbs to blend onto the body as if they’re part of the creature. The limbs should not look like sausages attached to the sides of the body.
See the images below.


R24: *SC in next st. SC next 2 sts tog.* Repeat all around. (12)
R25: *SC next 2 sts tog.* Repeat all around. (6)
Pinch the upper part of the legs to flatten them. Make sure the middle toe lines up with the crease created when you pinch the leg.
Tie off, leaving a thread (50cm) for sewing. Sew the last row closed.

FRONT LEGS
Finished size: 110mm long x 30mm at the widest point.
R1-23: Same as Back Legs.
R24-25: SC in each st around.(18)
Stuff and shape in the same manner as Back Legs.
R26: *SC in next st. SC next 2 sts tog.* Repeat all around. (12)
R27: *SC next 2 sts tog.* Repeat all around. (6)
Pinch the upper part of the front legs to flatten them. Make sure the middle toe lines up with the crease created when you pinch the leg.
Tie off, leaving a thread (50cm) for sewing. Sew the last row closed.
THE TAIL

Finished size: 120mm long x 75mm at the widest point.
R1: Using Body Colour, 4SC into a magic ring. (4)
Continue working in the round.
R2: 2SC in next 2 sts. SC in rem 2 sts. (6)
R3: SC in next 2 sts. 2SC in next st. SC in rem 3 sts. (7)
R4: SC in next 2 sts. 2SC in next 2 sts. SC in rem 3 sts. (9)
R5: SC in next 4 sts. 2SC in next st. SC in rem 4 sts. (10)
R6: SC in next 4 sts. 2SC in next 2 sts. SC in rem 4 sts. (12)
R7: SC in next 6 sts. 2SC in next st. SC in rem 5 sts. (13)
R8: SC in next 6 sts. 2SC in next 2 sts. SC in rem 5 sts. (15)
R9: SC in next 8 sts. 2SC in next st. SC in rem 6 sts. (16)
R10: SC in next 8 sts. 2SC in next 2 sts. SC in rem 6 sts. (18)
R11: SC in next 10 sts. 2SC in next st. SC in rem 7 sts. (19)
R12: SC in next 10 sts. 2SC in next 2 sts. SC in rem 7 sts. (21)
R13: SC in next 12 sts. 2SC in next st. SC in rem 8 sts. (22)
R14: SC in next 12 sts. 2SC in next 2 sts. SC in rem 8 sts. (24)
R15: SC in next 14 sts. 2SC in next st. SC in rem 9 sts. (25)
R16: SC in next 14 sts. 2SC in next 2 sts. SC in rem 9 sts. (27)
R17: SC in next 16 sts. 2SC in next st. SC in rem 10 sts. (28)
R18: SC in next 16 sts. 2SC in next 2 sts. SC in rem 10 sts. (30)
R19: SC in next 18 sts. 2SC in next st. SC in rem 11 sts. (31)
R20: SC in next 18 sts. 2SC in next 2 sts. SC in rem 11 sts. (33)
R21: SC in next 20 sts. 2SC in next st. SC in rem 12 sts. (34)
R22: SC in next 20 sts. 2SC in next 2 sts. SC in rem 12 sts. (36)
R23: SC in next 22 sts. 2SC in next st. SC in rem 13 sts. (37)
R24: SC in next 22 sts. 2SC in next 2 sts. SC in rem 13 sts. (39)
R25: SC in next 24 sts. 2SC in next st. SC in rem 14 sts. (40)
R26: SC in next 24 sts. 2SC in next 2 sts. SC in rem 14 sts. (42)
R27: SC in next 2 sts. *2SC in next st. SC in next 5 sts*. Repeat 5 more times. 2SC in next st. SC in rem 3 sts. (49)
R28: SC in next 2 sts. *2SC in next st. SC in next 6 sts*. Repeat 5 more times. 2SC in next st. SC in rem 4 sts. (56)
Tie off, leaving a thread (60cm) for sewing.
When stuffing the tail, make sure to put small amounts in first, to ensure that the tip of the tail is stuffed as well. Stuff the tail so the tip curves up.
Notice how the last 2 rows have widened the opening. When you place the tail on the body, this acts as a lip that helps blend the tail into the shape of the body, rather than looking like a disjointed separate piece. Use this to your advantage when attaching the tail to achieve a seamless join (more info in Assembly section).
The increases in the rows are the top of the tail, and indicate where it will be joined to the middle of the dragon’s back.
THE EARS
Make 2 - Finished size: 95mm long x 75mm at the widest point.
R1: Using Body Colour, 5SC into a magic ring. (5)
Continue working in the round.
R2: 2SC in each st around. (10)
R3: *SC in next st. 2SC in next st.* Repeat all around. (15)
R4: *SC in next 2 sts. 2SC in next st.* Repeat all around. (20)
R5: *SC in next 3 sts. 2SC in next st.* Repeat all around. (25)
R6: *SC in next 4 sts. 2SC in next st.* Repeat all around. (30)
R7: 2SC in next st. SC in rem 29 sts. (31)
R8: SC in next st. 2SC in next st. SC in rem 29 sts. (32)
R9: SC in next 2 sts. 2SC in next st. SC in rem 29 sts. (33)
R10: SC in next 3 sts. 2SC in next st. SC in rem 29 sts. (34)
R11: SC in next 4 sts. 2SC in next st. SC in rem 29 sts. (35)
Important note: Place a stitch marker in your increase stitches of row 11.
R12-14: SC in each st around. (35)
R15: SC in next 4 sts. SC next 2 sts tog. SC in rem 29 sts. (34)
R16: SC in next 3 sts. SC next 2 sts tog. SC in rem 29 sts. (33)
R17: SC in next 2 sts. SC next 2 sts tog. SC in rem 29 sts. (32)
R18: SC in next st. SC next 2 sts tog. SC in rem 29 sts. (31)
R19: SC next 2 sts tog. SC in rem 29 sts. (30)
R20: *SC in next 4 sts. SC next 2 sts tog.* Repeat all around. (25)
R21: *SC in next 3 sts. SC next 2 sts tog.* Repeat all around. (20)
R22: *SC in next 2 sts. SC next 2 sts tog.* Repeat all around. (15)
R23: *SC in next st. SC next 2 sts tog.* Repeat all around. (10)
R24: *SC next 2 sts tog.* Repeat all around. (5)
Tie off, sew closed and leave a thread (30cm) for sewing.
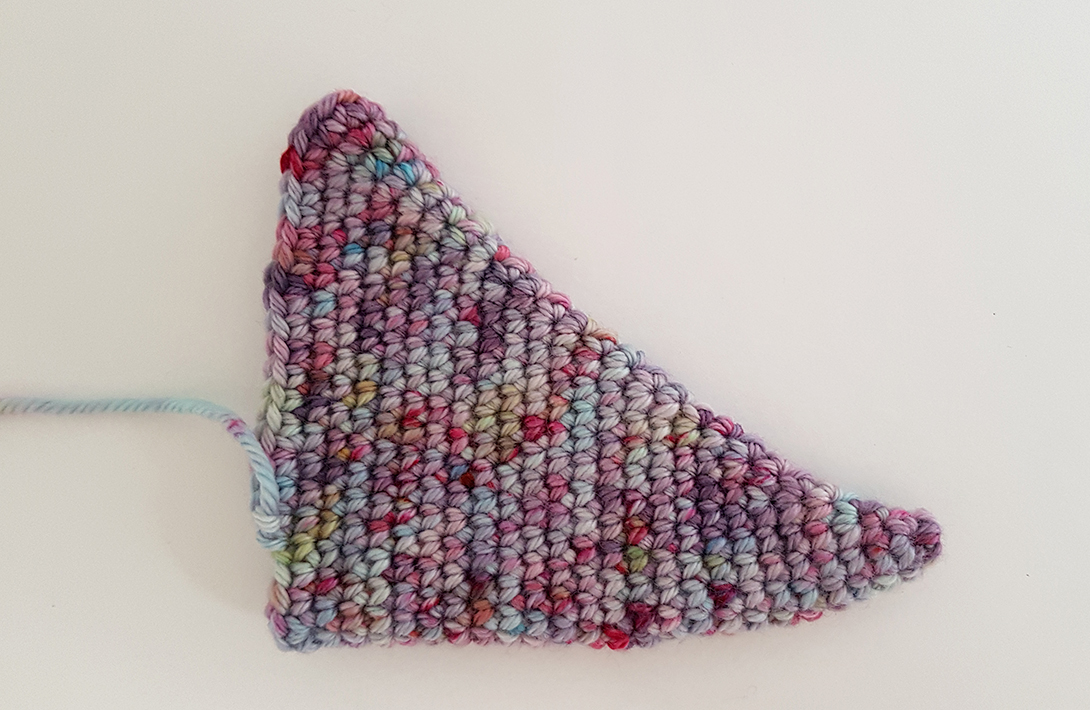
Lay the ears flat so that the extra increases (marked in row 11) run down one side of the ear. The ears should look like the image below; asymmetrical with a bulge created by the increases on one side.

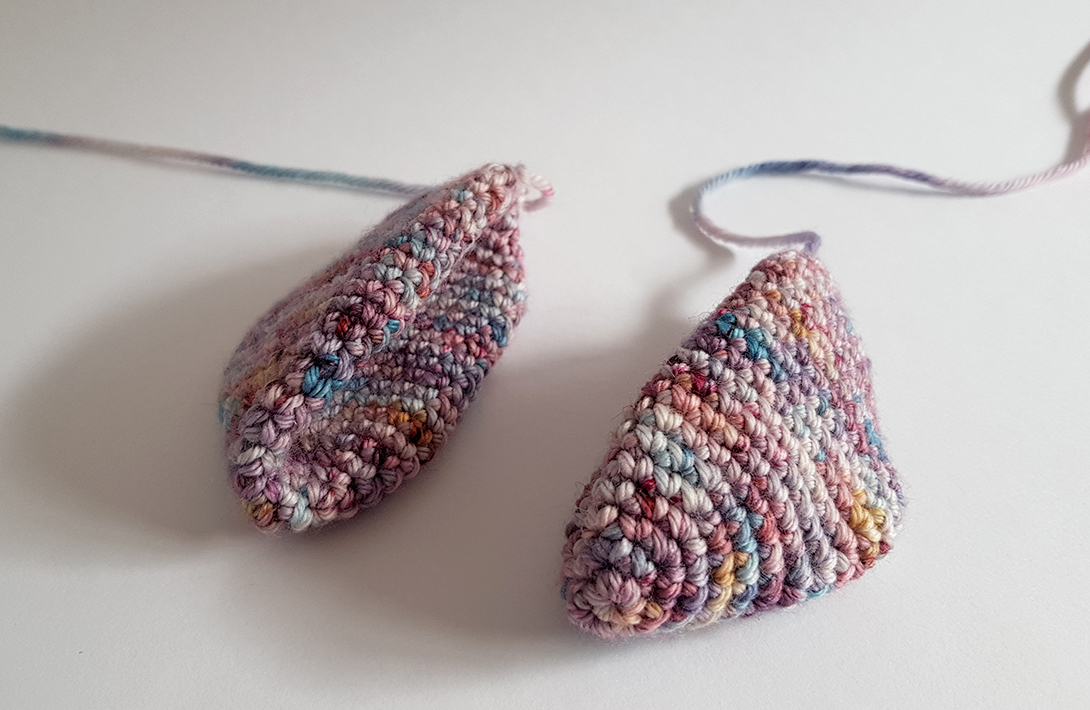
IMPORTANT: Now fold the ears into the correct shape. To do this, start with an ear orientated like the image below, with the extra increases running down the left-hand edge. Push the right-hand edge to collapse it into the ear. Do this on both ears.


- END OF PART 3 -

SUPPORT THE ARTIST
I hope you're enjoying the CAL so far! This pattern will ALWAYS be free, but if you would like to make a contribution to help me keep the free content coming, click on the button to donate via PayPal. Thank you for your support!
(Please enter your Payment methods data on the settings pages.)
PART 4
Subscribe to my mailing list to be notified via email when Part 2 is released. Join the Projectarian Facebook group to share pictures of your dragon with the rest of the Tribe, or tag @Projectarian on Instagram with the #OrbitTheDragon hashtag to share your pics! (You can also follow the hashtag to watch everyone's progress!)

PIN IT!

SHARE IT
Remember to share this page with all your crochet friends and crochet groups! Let's start a baby dragon epidemic!!
You may share this pattern using the buttons below, or copy and paste the URL to link to this page. Attribution to Projectarian must be given as the designer, and you may not use more than 3 pictures from this page. You're welcome to sell any little dragon you make using this pattern.
Omg, i didn’t start part 2 yet!!! Those foots are so tiny-cute! And love your sausages advice, it make me wide-smile 😀
Thank you again for sharing your awesome Orbit around the world Jessie ♡♡♡
Aw you’re welcome Meli 🙂 I’m so glad you’re enjoying it!! Better get cracking on Part 2!