UPDATES:
CLICK HERE FOR PART 2
CLICK HERE FOR PART 3
CLICK HERE FOR THE AFGHAN PATTERN!
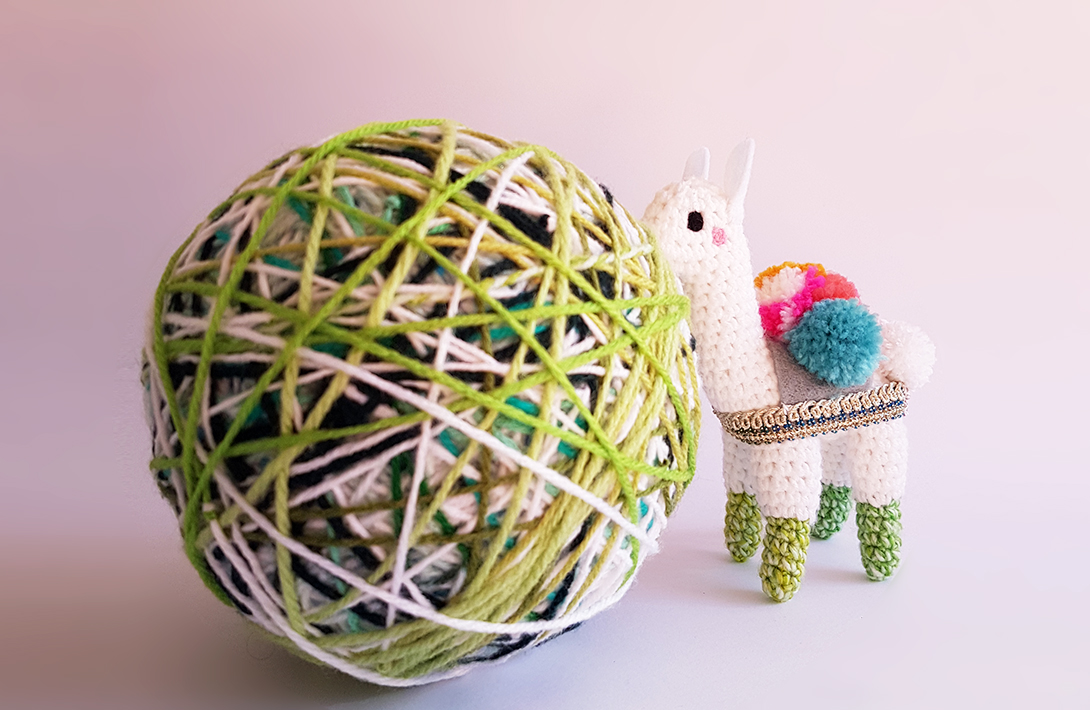
It’s Frankenstein’s Monster-Ball-of-Yarn!
Stash-buster projects (for using up leftover bits of yarn) usually require a substantial amount of yarn, so what do you do when you’re left with a stash of yarn pieces that are too short to actually crochet with? You make Frankenyarn!
I got the idea from this beautiful post by Handwerkjuffie and here’s how I did it:

I make a lot of small amigurumi so my yarn stash generally consists of very short lengths that I literally can’t use for crocheting anything. In the last 5 years since I learned to crochet, I slowly accumulated a bag of the stuff.
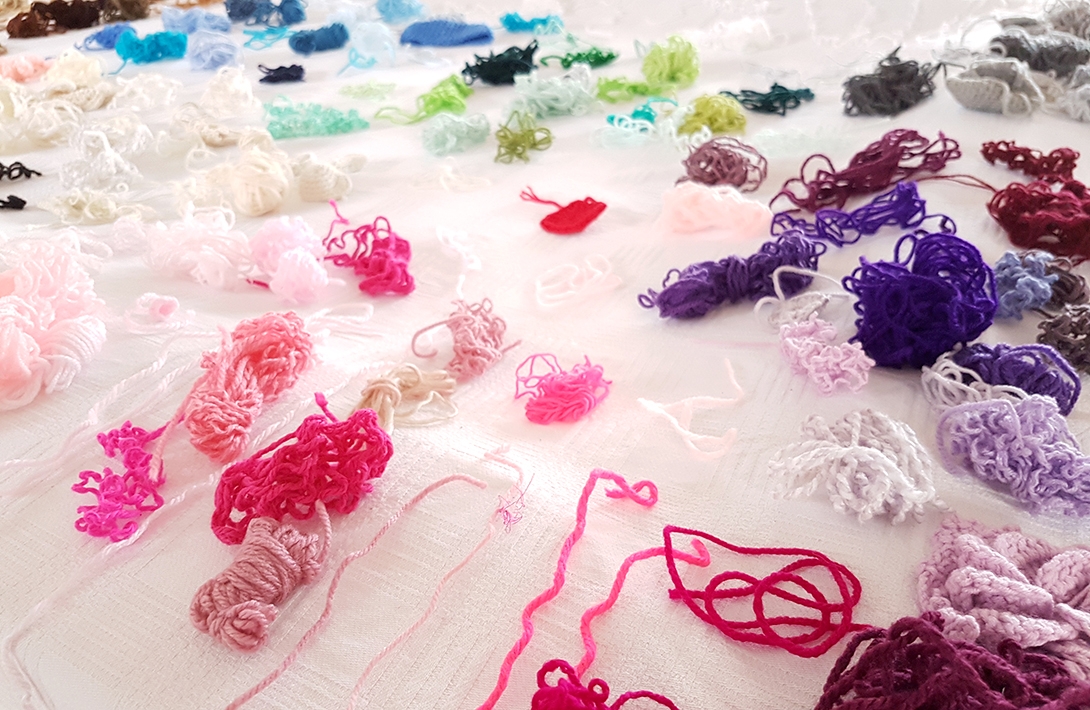
First I untangled everything and unraveled a few half-projects that had made it into the bag for recycling, and then separated the colours into groups. I had a group for pink, red, maroon, purple, orange (including peach), yellow, grey, brown, white (including cream) and an group for shades of fawn/tan/camel colours. I did include variegated yarns, but no textured yarns because I can still use those in small amounts for pony saddles.
Before joining all the yarn, I decided to plan what colour order they should go in. If I just put them in rainbow order then where would colours like maroon and fawn go? I checked which threads’ colours would blend well into the next and settled on the following order: brown, fawn, white, yellow, orange, pink, red, maroon, purple, blue, grey, green.
I had a massive amount of white, so I decided to mix it in throughout the whole ball, alternating between joining either a white thread or a new colour. Where I had multiple threads of the same colour, I joined a white thread between them. Where I had a long thread of one colour, I cut it and joined white in between to break it up. As far as thread length-goes, each piece was anywhere from 20cm to about 1m at the longest. I tried to make the lengths random when cutting them so the that whole ball would still be random in the end.

I generally only use double knit yarn so almost all my yarn was already the same weight, but I had a few 4- and 3ply threads. In some cases I just joined them like the rest of the threads, and in other cases I put 2 shades of 3ply threads together, so they’ll give a variegated look when they’re crocheted up.
In my opinion, the magic knot is the best way to join yarn – I use it for everything. It’s small, easy to conceal, and very strong! The video shows how to do the knot (thanks Bella Coco). Once you get used to it, it goes pretty quick.

It’s fun to watch the colours change like a giant jawbreaker as you slowly build your monster ball.

Even the leftover trimmings make a pretty picture!

My ball ended up weighing 375 grams! An average double knit ball is 100 grams, so I think that’s enough to make a decent little project, and I can’t wait to see how it crochets up! You can look forward to seeing that project in a future post 😉

Some curious Tiny Alpacas gathered to inspect it. They’re used to carrying pompoms but I can see the gears turning in their little heads as they wonder how they’ll fit this monstrosity on their backs.
When you make your own Frankenyarn project, tag #ProjectFrankenyarn on Instagram to show us your creation!
PIN IT !

I think this is an absolutely brilliant idea. I have been thinking of doing something similar but wasn’t quite sure how to spread the colors. My goodness I am now so keen to start I can’t wait. I also use the magic knot… such a fantastic way to join wool. Thanks so much for putting it all into perspective… Yay!!!!
Thanks Diana, I’m glad you found it helpful. I’m just dying to see how it looks crocheted up – and then we’ll know if it’s worth all the effort! Haha!
I didn’t bother to sort my yarn in colour groups, it was all in a big bag, and I just dived in and crocheted what came out! So far, a pretty bowl is emerging,I’m finding it great fun!
Sounds like fun! I tried the same thing – using the colours up randomly – but the colours ended up clashing too much so I had to sort them in order to be able to use every single colour. I’m glad it’s working out for you though!
Awww, don’t let all those happy little knot scraps go to waste! Every bit of yarn is useable no matter how short, frayed, slubbed, discolored, too thick, too thin – or otherwise unworkable in your current projects. Especially those little knot clippings!
They just love to be mixed into the stuffing of anything that needs to be stuffed, or used alone as the main stuffing. Use them as a center for stuffing bombs when you want to be sure the colors wont show through.
Hi Karen! I used to feel the same, but crochet is my full-time job. I have crates of yarn, crates of works-in-progess, and until now, a whole crate just for my yarn stash. I am a creative person so I have tons of different art supplies crammed into every spare cupboard, drawer and basket. In order to keep it even remotely organized so that I can find what I need when I need it, I unfortunately can’t keep things like this in the off-chance that I get to use them as stuffing or work them into other projects one day. That being said, I am highly conscious of wastage, and do try to waste as little as possible. 🙂
Hi Jessie, Just came across this project. Love it and it’s at the top of my to do list. When tying your colors by each group does that mean you take one from each group and continue in that order the whole way through the Afghan? Do you know where I can get the pattern for the Afghan?
Love all your work.
Thanks
Hazel
Hi Hazel! You can get the pattern here: https://www.projectarian.com/2018/08/14/frankenyarn-blanket-part-4-free-pattern/
Hopefully the pictures will help answer your question about the colours. What I meant by the grouping is you put all the pinks together, then all the red, the all the oranges, for example, so that you end up with one long thread of pink which gradually becomes red, then orange. Each group only occurs once throughout your whole. ball. I hope that helps explain it?
I’ve done this and now have 2 balls but not sure what to knit with it. Any ideas?
Hey Dawn! It depends on the yardage that you have in your 2 balls. You could possibly try searching Raverly and using the filter to select projects to suit the amount of yarn that you have on hand. You can weight your balls and then choose a project according to the average weight of yarn that you’ve used in the balls. That should at least help you find some inspiration 🙂